Setup Instructions
Please follow these instructions carefully.
Most tutorials come with files that help you to not only understand the concepts, but more importantly to build a strong practical understanding! You need to setup a test environment in order to install the files that come with each tutorial.
If you have not setup a test environment yet, this is discussed in step two below. For every tutorial, please ensure that you follow the five steps below in order to properly setup your environment.
Step 1: Download the Extension
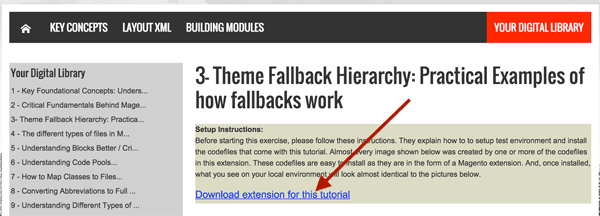
Beneath the title of a tutorial, there is a link where you can download an extension that is specifically built for the current tutorial. This is what you need to do:
- Please click this link to download the extension for the current tutorial (shown in the picture below).
- Once you download it, please place it on your desktop.
- Then, please unzip this file.

Please note, there are around 5 tutorials on the website that do NOT have an extension that needs to be installed. These 5 tutorials do NOT have a beige box with a link in it like the one picture above! You do not need to complete any of these installation instructions if you do not see this beige box.
Step 2: Make Sure You Have a Test Environment Setup
You can install all of these extensions on the same test environment because none of these conflict with one another. If you don’t have an environment, I would highly recommend setting one up using Vagrant (vagrant instructions).
Your test site should use Magento community 1.9.1 (or higher). These extensions also work with Magento Enterprise, and if you choose to use that, then please use version 1.14 or higher. Even though these are the recommended versions, the extensions will probably run perfectly on all versions of Magento except for those versions of Magento community that are lower than 1.6.
Step 3: Install the Extension
Now, it’s time to install the extension and this is how you do it:
- First, please ensure you have already unzipped the file that came with the tutorial you are working on. If not, unzip it!
- Second, run the command below to copy the unzipped folder into the root directory of your webiste.

You can now proceed to the next step.
Step 4: Flush the Cache Storage
Great, the extension is installed. All you need to do is ‘Flush the Cache Storage’. Here is what you need to do to ‘Flush the Cache Storage’.
- First, login to the Magento admin.
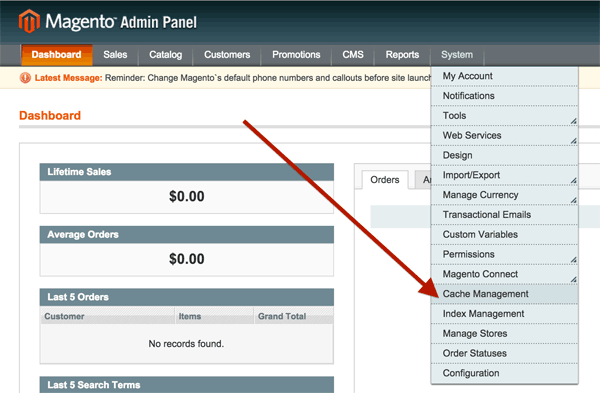
- Second, hover over the ‘System’ drop down menu and left click on the item called ‘Cache Management’.

- Third, left click on the button that says ‘Flush Cache Storage’. (pictured below) You may now proceed to the next step.

Step 5: Disable The Three Cache Types Mentioned Below
For all of these tutorials, please disable the ‘Configuration’ cache, the ‘Layouts’ cache, and the ‘Blocks html output’ cache (pictured below). For a tutorial to work properly, these cache types need to be disabled.
To do this:
- Please left click on the checkboxes to the left of Configuration, Layouts, and Blocks html output.

- Then, under the ‘Actions’ drop down menu select disable, and then left click on the submit button.

Great, you have now disabled these three cache types. Each of these should be marked as ‘Disabled’ as shown in the picture below.

Great, you have now finished setting up the tutorial you are working on!


