1 - Understanding the Basics
Setup Instructions:
Before starting this exercise, please follow these instructions.
They explain how to setup your test environment and install the codefiles that come with this tutorial. Once these are installed, your local environment will look almost identical to the pictures below.
In a nutshell, what is the purpose of the layout XML?
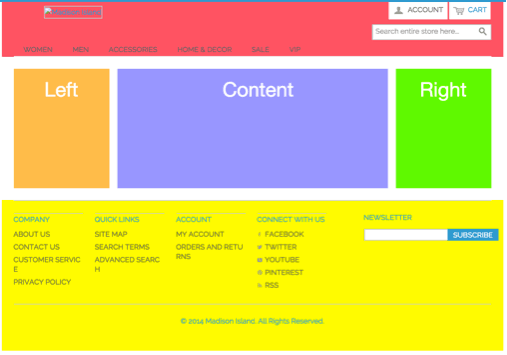
The layout xml is responsible for determining what blocks should be displayed and where they should be located on the page. Below is a picture of a page in Magento showing the structural blocks with solid colors. Structural blocks are container blocks that children blocks are placed in.
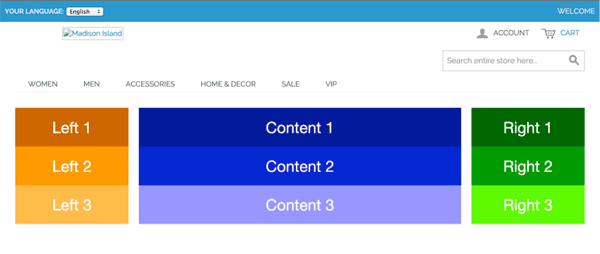
The page in the picture below has 3 blocks are in the left, column 3 blocks are in the main content area, and the 3 blocks are in the right column. The layout XML determined which blocks appear each of these columns. So, in short, the layout xml determines which blocks are loaded and where they should be placed on the page.
Foundation of Layout XML: The Critical Concepts
One some pages in Magento over 50 blocks need to be rendered. When Magento renders a page what block is the first one to be output? On every page, the first block Magento attempts to render is the root block. Every block is a child or grandchild of root. Therefore, when the root blocked is rendered this creates a chain reaction that then renders every block on the page.
A picture of the root block in the layout xml is shown below. (this is located in the file called page.xml)

The picture of the root block above indicates that the template file associated with this block is ‘page/3columns.phtml’. When Magento render’s the root block, it outputs this template file which is shown below. Please note, below, I will refer to the root block’s template file as the main template file.
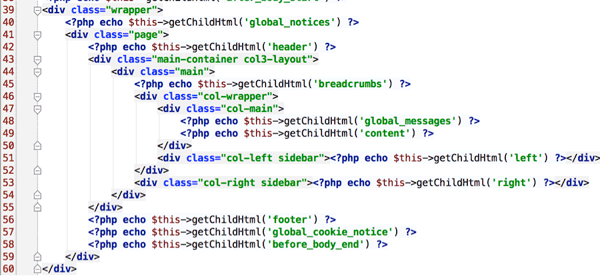
Every block the root’s template file outputs (this is the above picture) is considered to be a structural block. A structural block is simply a top-level block meaning that it has no parents (except for root). Please note, whenever you see the function getChildHtml this means a block is being output.
When the structural blocks are rendered (shown in above picture), this triggers a chain reaction that causes every block on the page to be rendered. The reason for this is that every block on the page is a child or grandchild of one of these structural blocks.
What blocks need to be loaded on each page?
In the above template file, when we see a function like getChildHtml(‘left’), this means that this line of code is rendering the block called ‘left’. When we look at the above template file we see that it is outputting many blocks.
However, before the template file is rendered, Magento must load all the blocks that will need to be rendered. The layout XML file is where you declare the blocks that need to be loaded.
So, where in the layout XML are the structural blocks declared. These structural blocks are declared in the page.xml file and a picture of this is shown below. We can see that the block tag is used to declare each block.
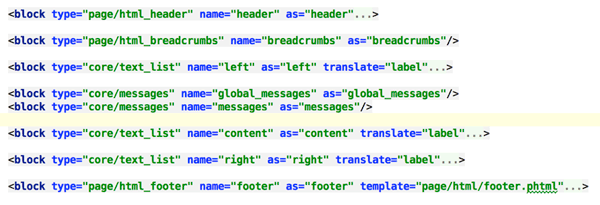
So, the picture above shows the structural blocks being declared. Every page in a default Magento has almost the same structural blocks; same pages are just organized slightly differently. So, if every page has almost the same structural blocks what makes each page look different?
The children blocks are what make each page look distinctly different. So, the next question is, how does Magento know which child blocks to load?
Tags exist in the layout xml that look a lot like the url of a webpage. For example, please navigate to the page yourdomain/layoutxmlintro/basicexample/index. In the module you installed at the beginning of this exercise, please open the file called layoutxmlintro.xml. You will notice there is a tag called <layoutxmlintro_basicexample_index>. This looks exactly like the url; the only difference is that underscores replace the slashes.
The tag that looks like the url is called the handle. All of the xml inside of the handle will be loaded. Magento only loads those blocks that are inside of the handles. A page has more than one handle, but the one that looks like the url is the main one. Later, a separate tutorial will be devoted explaining the topic of handles in detail.
Adding Blocks to a Page
Let’s say we would like to add a block to the page. How do we do that? The best way to do this is to use the reference tag. A picture below shows a layout xml file that is adding blocks to the left, content, and right blocks.

In the above picture, each of the reference tags (each is in a red square) contain 3 blocks inside of them. Let’s take the reference tag called ‘left’ as an example. This reference tag contains 3 blocks inside of it. The names of these blocks are layoutxmlintro.left1, layoutxmlintro.left2, and layoutxmlintro.left3. These blocks are shown below and this is the text they display ‘Left 1’,’Left 2’,’Left 3’.
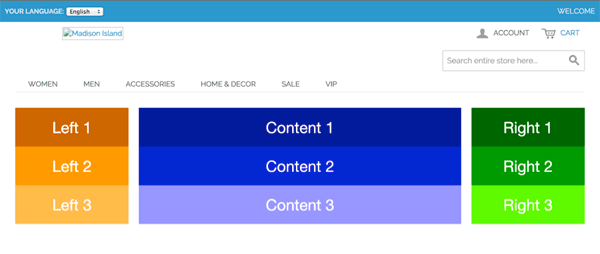
So, to summarize, all we had to do to add a block was to add a line to the layout xml and the block automatically appeared on the page. Sometimes you will need to perform more work for blocks to appear but that will be discussed in later tutorials.
Please observe how above we used a <reference name=”left”> tag. Inside of this tag, the children blocks that needed to be listed were declared. The reference tag is doing what its name indicates; it is referring to a block called left. The block that was being referenced was declared here in the page.xml file. This is the block that is being referred to is called ‘left’ and an arrow is pointing to it in the picture below.

So, the reference block takes the blocks that are nested inside of it and inserts them into the parent block called left in this case. The picture below shows exactly what the reference tag is doing. It’s inserting three blocks children blocks into the parent called ‘left’.

Summary:
- The reference tag is not a new block. It refers to an existing block!
- The reference tag inserts all blocks it contains into the block it is referring to.
Template Blocks contain the html that is displayed
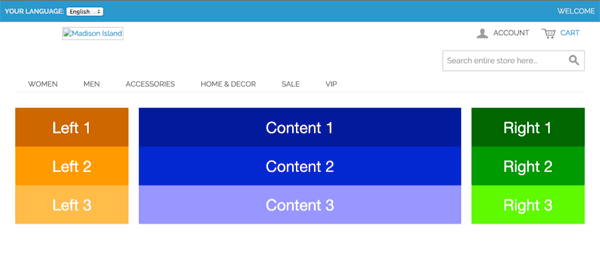
How does Magento know what html needs to be output. The code snippet below creates the blocks that appear in the middle column. Please observe that the template tag tells us the name of the file that contains the html.

If you look in these three files, you will see the html that appears in the middle column below.
Great Work, you have now completed.


